---
title: How to Create/Remove client's files
description: How to Create/Remove Client’s Files
---
[Skip to content](https://knowledge.nexone.ca/en-ca/how-to-create/remove-clients-files#main-content)
English - Canada
Show submenu for translations
[](https://knowledge.nexone.ca/en-ca?hsLang=en-ca)
- [NexOne Agent](https://knowledge.nexone.ca/en-ca/nexone-agent)
- [NexOne Office](https://knowledge.nexone.ca/en-ca/nexone-office)
- [NexOne Legend](https://knowledge.nexone.ca/en-ca/nexone-legend)
Open main navigation
Close main navigation
- [NexOne Agent](https://knowledge.nexone.ca/en-ca/nexone-agent)
- [NexOne Office](https://knowledge.nexone.ca/en-ca/nexone-office)
- [NexOne Legend](https://knowledge.nexone.ca/en-ca/nexone-legend)
- English - Canada
Show submenu for translations
- [Free Webinars](https://nexone.ca/)
[Free Webinars](https://nexone.ca/)
How can we help you?
- There are no suggestions because the search field is empty.
1. [NexOne](https://knowledge.nexone.ca/en-ca?hsLang=en-ca)
2. [NexOne Legend](https://knowledge.nexone.ca/en-ca/nexone-legend?hsLang=en-ca)
3. [Clients](https://knowledge.nexone.ca/en-ca/nexone-legend?hsLang=en-ca#clients)
June 9, 2026
# How to Create/Remove client's files
***Creating a Client’s File***
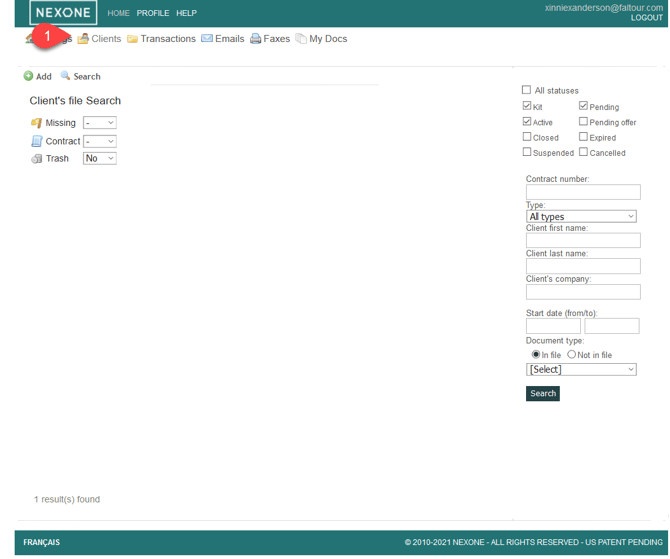
1\. Click on the **Client's** tab
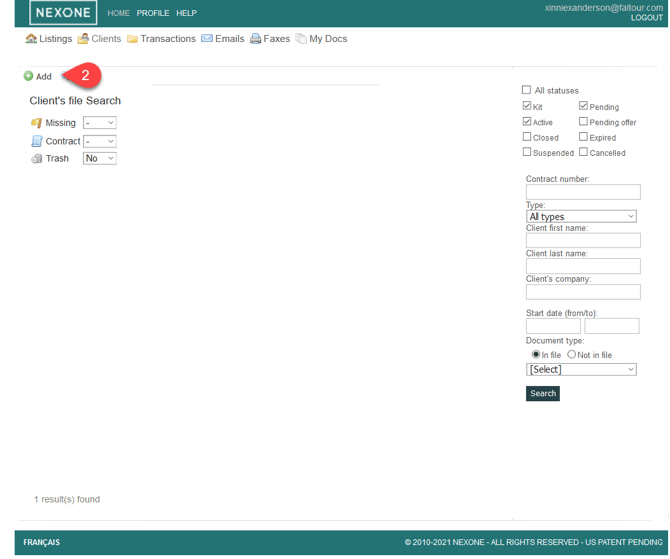
2\. Click on the **Add** button
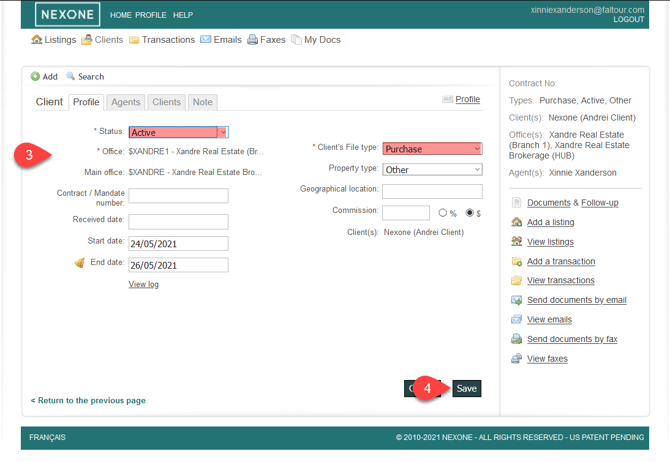
3\. Fill the Client's File profile information, then click **Next** (make sure to fill at least the required field: **Status, Office & Type**)
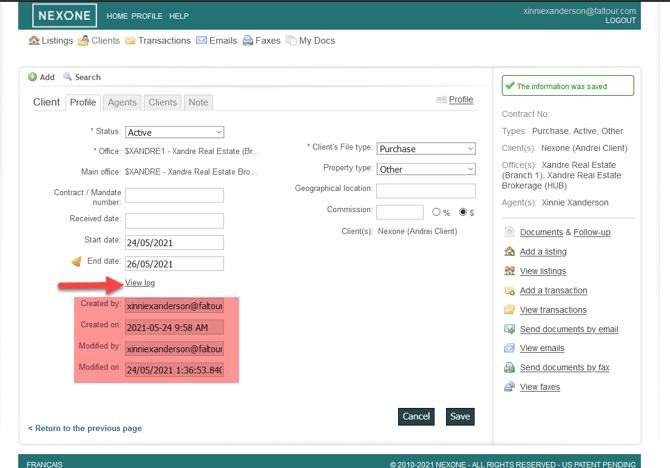
**TIP: Click on view log to see when and by who the Client's File was created and modified**
****
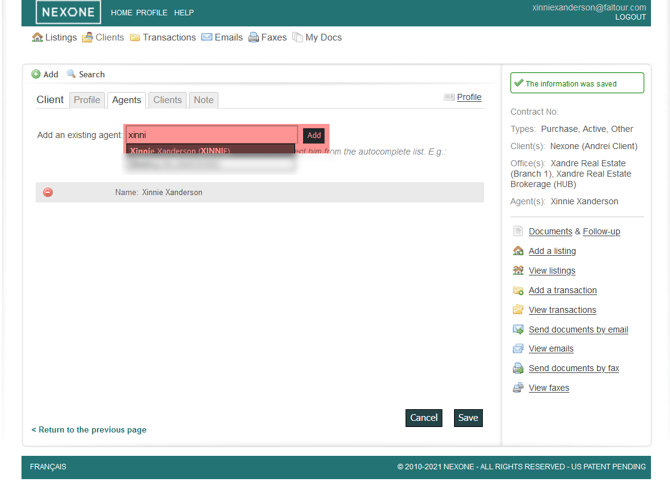
4\. Fill the Agent's tab by adding the corresponding agents to your Client's File, using the **dropdown menu**, then click **Next**
****
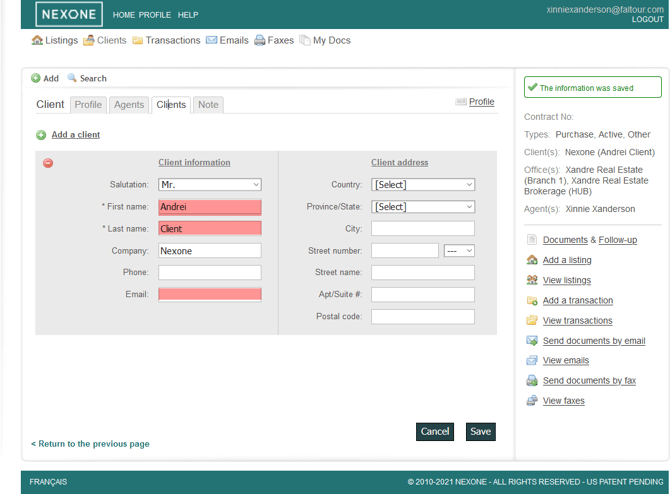
5\. Fill the Client's tab by adding the corresponding clients information, then click **Next** (make sure to fill at least the required field: **First/last name & Email address**)
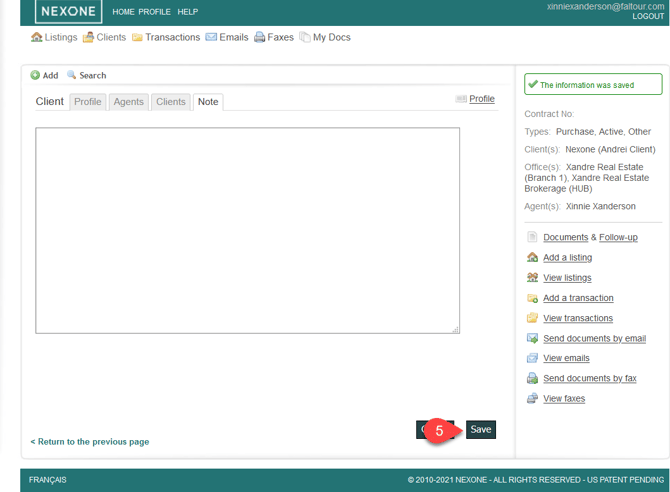
6\. You can leave a note if necessary **(not mandatory)**, and then click **Save** at the bottom of your page
***Removing a Client’s File***
***Note: Only Kit status files can be sent to trash. If your status is not set as a "Kit", then you will have to contact your office Admin to send your file to trash***
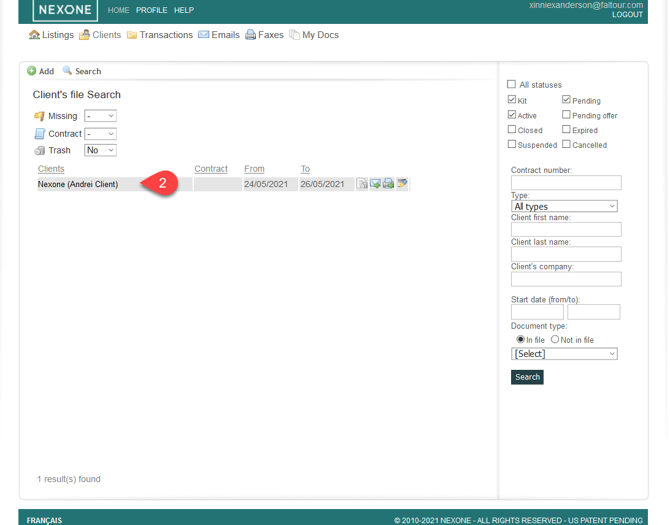
1\. Click on **Client's** tab
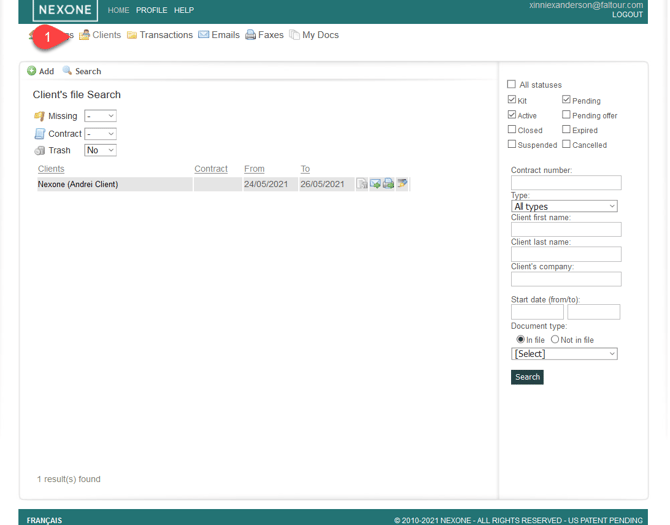
2\. Click on your Client's File **name**
****
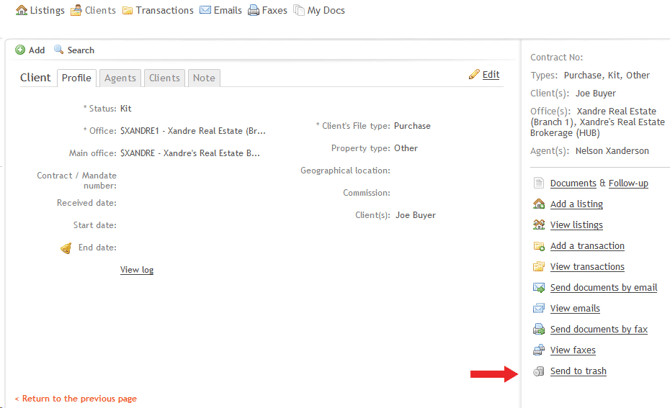
3\. Click on **Send to Trash** on your right hand
- [NexOne Agent](https://knowledge.nexone.ca/en-ca/nexone-agent?hsLang=en-ca#main-content)
- [General](https://knowledge.nexone.ca/en-ca/nexone-agent?hsLang=en-ca#general)
- [Accounts & Billings](https://knowledge.nexone.ca/en-ca/nexone-agent?hsLang=en-ca#accounts-billings)
- [Clients](https://knowledge.nexone.ca/en-ca/nexone-agent?hsLang=en-ca#clients)
- [Transactions](https://knowledge.nexone.ca/en-ca/nexone-agent?hsLang=en-ca#transactions)
- [Documents and Forms](https://knowledge.nexone.ca/en-ca/nexone-agent?hsLang=en-ca#documents-and-forms)
- [Electronic Signatures](https://knowledge.nexone.ca/en-ca/nexone-agent?hsLang=en-ca#electronic-signatures)
- [Activities](https://knowledge.nexone.ca/en-ca/nexone-agent?hsLang=en-ca#activities)
- [Calendars and Scheduling](https://knowledge.nexone.ca/en-ca/nexone-agent?hsLang=en-ca#calendars-and-scheduling)
- [Brokerage](https://knowledge.nexone.ca/en-ca/nexone-agent?hsLang=en-ca#brokerage)
- [Teams & Sharing](https://knowledge.nexone.ca/en-ca/nexone-agent?hsLang=en-ca#teams-sharing)
- [Integrations](https://knowledge.nexone.ca/en-ca/nexone-agent?hsLang=en-ca#integrations)
- [Common Trouble Shooting](https://knowledge.nexone.ca/en-ca/nexone-agent?hsLang=en-ca#common-trouble-shooting)
- [what's New?](https://knowledge.nexone.ca/en-ca/nexone-agent?hsLang=en-ca#whats-new)
- [Get a 1-on-1 training](https://knowledge.nexone.ca/en-ca/nexone-agent?hsLang=en-ca#get-a-1-on-1-training)
- [Processing the File for 121QA Service](https://knowledge.nexone.ca/en-ca/nexone-agent?hsLang=en-ca#processing-the-file-for-121qa-service)
- [NexOne Office](https://knowledge.nexone.ca/en-ca/nexone-office?hsLang=en-ca#main-content)
- [Dashboard (New Version)](https://knowledge.nexone.ca/en-ca/nexone-office?hsLang=en-ca#dashboard-new-version)
- [Signature (New Version)](https://knowledge.nexone.ca/en-ca/nexone-office?hsLang=en-ca#signature-new-version)
- [Listings (New Version)](https://knowledge.nexone.ca/en-ca/nexone-office?hsLang=en-ca#listings-new-version)
- [Buyer Agreements (New Version)](https://knowledge.nexone.ca/en-ca/nexone-office?hsLang=en-ca#buyer-agreements-new-version)
- [Transactions (New Version)](https://knowledge.nexone.ca/en-ca/nexone-office?hsLang=en-ca#transactions-new-version)
- [Accounting (Not Updated | Old Version)](https://knowledge.nexone.ca/en-ca/nexone-office?hsLang=en-ca#accounting-not-updated-old-version)
- [Calendar (Not Updated | Old Version)](https://knowledge.nexone.ca/en-ca/nexone-office?hsLang=en-ca#calendar-not-updated-old-version)
- [Dashboard (Not Updated | Old Version)](https://knowledge.nexone.ca/en-ca/nexone-office?hsLang=en-ca#dashboard-not-updated-old-version)
- [Listings (Not Updated | Old Version)](https://knowledge.nexone.ca/en-ca/nexone-office?hsLang=en-ca#listings-not-updated-old-version)
- [Transactions (Not Updated | Old Version)](https://knowledge.nexone.ca/en-ca/nexone-office?hsLang=en-ca#transactions-not-updated-old-version)
- [Alerts (Not Updated | Old Version)](https://knowledge.nexone.ca/en-ca/nexone-office?hsLang=en-ca#alerts-not-updated-old-version)
- [EDM and Signatures (Not Updated | Old Version)](https://knowledge.nexone.ca/en-ca/nexone-office?hsLang=en-ca#edm-and-signatures-not-updated-old-version)
- [Statistics (Not Updated | Old Version)](https://knowledge.nexone.ca/en-ca/nexone-office?hsLang=en-ca#statistics-not-updated-old-version)
- [Contact (Not Updated | Old Version)](https://knowledge.nexone.ca/en-ca/nexone-office?hsLang=en-ca#contact-not-updated-old-version)
- [Communications (Not Updated | Old Version)](https://knowledge.nexone.ca/en-ca/nexone-office?hsLang=en-ca#communications-not-updated-old-version)
- [NexOne Forms (Not Updated | Old Version)](https://knowledge.nexone.ca/en-ca/nexone-office?hsLang=en-ca#nexone-forms-not-updated-old-version)
- [Tips & Tricks (Not Updated | Old Version)](https://knowledge.nexone.ca/en-ca/nexone-office?hsLang=en-ca#tips-tricks-not-updated-old-version)
- [Profile (Not Updated | Old Version)](https://knowledge.nexone.ca/en-ca/nexone-office?hsLang=en-ca#profile-not-updated-old-version)
- [Financial Picture (old version)](https://knowledge.nexone.ca/en-ca/nexone-office?hsLang=en-ca#financial-picture-old-version)
- [NexOne Legend](https://knowledge.nexone.ca/en-ca/nexone-legend?hsLang=en-ca#main-content)
- [General](https://knowledge.nexone.ca/en-ca/nexone-legend?hsLang=en-ca#general)
- [Listings](https://knowledge.nexone.ca/en-ca/nexone-legend?hsLang=en-ca#listings)
- [Clients](https://knowledge.nexone.ca/en-ca/nexone-legend?hsLang=en-ca#clients)
- [Transactions](https://knowledge.nexone.ca/en-ca/nexone-legend?hsLang=en-ca#transactions)
- [Office & Employees](https://knowledge.nexone.ca/en-ca/nexone-legend?hsLang=en-ca#office-employees)
- [Documents & Follow-up](https://knowledge.nexone.ca/en-ca/nexone-legend?hsLang=en-ca#documents-follow-up)
- [Forms](https://knowledge.nexone.ca/en-ca/nexone-legend?hsLang=en-ca#forms)
- [Integrations](https://knowledge.nexone.ca/en-ca/nexone-legend?hsLang=en-ca#integrations)
- [Billing](https://knowledge.nexone.ca/en-ca/nexone-legend?hsLang=en-ca#billing)
- [GoEmail](https://knowledge.nexone.ca/en-ca/nexone-legend?hsLang=en-ca#goemail)
- [Setup](https://knowledge.nexone.ca/en-ca/nexone-legend?hsLang=en-ca#setup)
- [FAQ](https://knowledge.nexone.ca/en-ca/nexone-legend?hsLang=en-ca#faq)
- [Webinar / Ring Central Meeting](https://knowledge.nexone.ca/en-ca/nexone-legend?hsLang=en-ca#webinar-ring-central-meeting)
- [Tips & Tricks](https://knowledge.nexone.ca/en-ca/nexone-legend?hsLang=en-ca#tips-tricks)
- [what's new?](https://knowledge.nexone.ca/en-ca/nexone-legend?hsLang=en-ca#whats-new)
[](https://nexone.ca)
Copyright NexOne Corporation, All rights reserved 2026-2027.
Privacy policy | Cookies